We are going to explain step-by-step how to waterproof a rooftop using Casali Acryrubber liquid coating system
This case study has the purpose to analyze the steps needed to answer the question on how to waterproof a rooftop and execute a proper system with Casali liquid coatings starting from a new concrete rooftop.
We have chosen to propose the Acryrubber system.
Acryrubber is a very versatile and performing polymer-based waterproofing and it is available in several standard color.
The Acryrubber is UV stable and its excellent flexibility makes the product particularly suitable for rooftop jobsite since it withstands very well the hairline cracks and the micro movement of the slab.
Click HERE to download the related brochure.
The Acryrubber system is normally combined with:
- Acryfelt Mesh, a special honey-comb pattern polyester reinforcement that guarantee extreme flexibility and transversal and longitudinal strength.
- Casaband SA, a special butyl self-adhesive tape which is particularly suitable to reinforce corners and details.
Casaband is extremely easy to use and it can be easily coated with Acryrubber thanks to its fabric on top.
We have also chosen Acryrubber system because the jobsite has a nice slope where the water flows quite smoothly to the drainage systems.
Note: we would have recommended instead to use Acryroof Plus Fibro system in case the jobsite had depressions and ponding areas that might affect the waterproofing performances.

Image: stratigraphy of Acryrubber system
The finishing layer will be done with Acrytop, a special coating to make the surface walkable.
We will line-up the following steps to show how to waterproof a rooftop:
- Introduction (before the job)
- Cleaning and general repairing
- Application of first layer of Acryrubber (diluted with clean water)
- Application of Casaband SA
- Application of second layer of Acryrubber and reinforcement Acryfelt Mesh
- Application of third layer of Acryrubber
- Application of Acrytop
- Job completed
Introduction on how to waterproof a rooftop (before the job)
The jobsite is located in Bangkok greater area at the Siam Trade Development building. It is a newly established building where the rooftop has been waterproofed with a liquid coating.
The contractor did not take any precautions during the application of the coating; no reinforcement (such as Acryfelt Mesh) and no joint protection (such as Casaband SA).
The application was just done by applying a couple of layers of waterproofing coating all over the 150 sqm surface.
The micro-movements of the building have created some hairline cracks on the roof slab and several leakages happened, creating water infiltrations in the below floor (private house with living room and bedrooms).

The roof slab cracks were so nasty that the contractor had to fix the rooftop a couple of times by re-paint the areas where they were thinking the problem was coming from.
Finally the owner decided to re-coat the entire rooftop with a long lasting solution like Acryrubber system in order to avoid “temporary fixing” on a regular basis.
Cleaning and general repairing
The first activity is to clean the existing slab and prepare the surface for the upcoming new waterproofing system.
This is a necessary requirement in order to understand how to waterproof a rooftop. NOTE: Casali Acryrubber system is a fully bonded solution and this means that the products will be completely bonded on the surface, if the surface is not well cleaned and prepared we will have detachment and the new waterproofing system will likely fail.
CASALI normally requires the surface to be clean, free from oil, free from dust, solid and firm.
STEP 1
You need to remove the old and weak waterproofing coating to create a solid surface and a good bonding for your Casali waterproofing system.


The images above show the weakness of the old waterproofing product, which was poorly bonded.
Note: there is no need to entirely remove the old waterproofing system if the bond with the surface and the waterproofing is still in good condition, so you probably just need to grind the entire surface to make it rougher and ready for a new waterproofing system.
STEP 2
Fix the cracks with a special mortar by using a product suck as Casali Taurocrete RR which guarantee a good bonding and non-shrink.

Keep working on the preparatio of the surface until the slab is clean and compact.
Reminder: a poorly executed surface preparation will have effect in the entire waterproofing system that you will make on top of it, we do recommend to take your time with no rush.
Once the surface is well prepared you can start with the application of the waterproofing system.
The image below shows the roof slab after the cleaning.
Note: the workers have cleaned and removed as much as they could, some areas are still covered with the old coating which was still in good condition and pretty bonded on the concrete surface so they have decided to leave it.

Application of first layer of Acryrubber (diluted with clean water)
Now you can start with the application of the first waterproofing layer by using Casali Acryrubber diluted with water to make the product more fluid and liquid.
Acryrubber does not need any specific primer if we apply on rough concrete subbase, but the primer will be the Acryrubber itself by diluting it with clean water.
Casali Acryrubber is a thick coating and it is recommended to dilute it with clean water to properly make the product penetrate into the concrete substrate to have a better and stronger bonding.
We recommend adding approximately 10% clean water (by weight) to Acryrubber.
The ratio with water:
It is depending much on the current jobsite conditions, hot climate conditions will perhaps require to use a little more clean water than usual.


Tip: the jobsite has been done in Bangkok (Thailand), a tropical Country with particular hot weather conditions, the extreme heat does affect the application of Acryrubber.
Acryrubber is a water-based polymer product and the high temperature and direct sunlight during application might affect the dilution of the product.
We do recommend, indeed, to carry out the application of Acryrubber away from hottest hours of the day and away from direct sunlight.
Early morning and late afternoon will be the perfect moments of the day to apply Acryrubber.
The consumption of Acryrubber:
The total consumption of the product in this jobsite is approximately 2 kg/sqm (total consumption for the total system) and and if we need to properly understand how to waterproof a rooftop we also have to understand what is the consumption of the product for each layer.
Remember that Acryrubber will be applied in 3 layers (download the Acryrubber brochure to see the stratigraphy of the layers). The first layer diluted with water to be used as a primer to promote the adhesion between the concrete and the following layers, in this case we suggest to use about 0.6-0.7 kg/sqm.
Note: we do recommend also to prepare the necessary quantity of Acryrubber in advance to make sure that you will use the right quantity without any leftover or overconsumption.

Image: the jobsite after the first layer of Acryrubber.
Let the product properly cure in order to start application of the next layer.
Note: the curing time is very depending on the weather conditions; dry and sunny day will cure the product faster than humid and cloudy days.
Application of Casaband SA
Casaband SA is a self-adhesive butyl band to be used in corners and details as elastic reinforcement for waterproofing floor-wall joints and expansion joints on terraces, balconies, swimming pools, bathrooms, etc.
In this specific case-study the Casaband SA was used in the perimeter and around the columns.
Note: the perimeter had several hairline cracks and weakness due to the vibration of the building, resulting in water infiltrations and leakages.
The Casaband SA was chosen as a perfect solution to prevent this to happen.


The above images show a good example of how to properly apply the band.
The images show the Casaband SA along the perimeter and corner, and the Casaband SA around the column.
The application of Casaband SA is completed when you coat the band with Acryrubber; the band is topped with a soft fiber that allows a good impregnation by the Acryrubber.


The images above show the worker applying Acryrubber over the Casaband SA and the other image is the band fully coated with Acryrubber. This process will protect the product and will intertwine the band with the waterproofing system.
This process will integrate the Casaband SA in the waterproofing system by creating a kind of “sandwich” where the band is in between 2 layers of Acryrubber coating.
The scope of the application of Casaband SA is to reinforce the corners and details which are specific spots where generally the problems occurred because they are particularly affected by the micro movements of the building.
Application of second layer of Acryrubber and reinforcement Acryfelt Mesh
The application of the reinforcement is a necessary procedure when you take into consideration how to waterproof a rooftop.
Casali technicians have proposed Acryfelt Mesh for this case-study.
This phase is related to the application of the reinforcement Acryfelt Mesh which will be then soaked with Acryrubber to create a fully integrated system.
Acryfelt Mesh is an alkali-resistant reinforcement in polyester with a special hone-ycomb structure that ensures easy impregnation of the screen, high resistance to longitudinal and transverse loads and good elasticity to diagonal loads.
The key advantages:
The key advantages of this reinforcement compared to others (like the net for example) are:
- extreme elasticity that allow the ful system to withstand the movement of the building and prevent the appearance of cracks on the surface of the waterproofing system.
- excellent strength which is necessary to face the longitudinal and transversal loads that the waterproofing system will experience in its lifespan

The Acryfelt Mesh close-up image shows the honey-comb pattern.
This particular structure allows the product to be perfectly soaked with Acryrubber.
The application of the Acryfelt Mesh is very easy and intuitive, just lay down the Acryfelt mesh and coat it with Acryrubber, like in the image below.

The coating process must be done with some precautions.
- It is recommended to dilute the Acryrubber with a little water to make the produce a little more fluid and liquid to penetrate into the pattern of the honey-comb structure of the Acryfelt Mesh. This is particularly true in geographic areas with extreme heat like Thailand.
- The coating process need to bond the Acryfelt Mesh to the subbase and it is so recommended to pay particular attention on this.
The consumption of Acryrubber for this layer will be about 0.7 kg/sqm.
Note: the Acryfelt Mesh is packed in rolls wish size 50mt*1mt, total 50sqm/roll.
When it comes to overlapping the rolls side by side just pay attention to overlap approximately 5-10 cm on each side. This process will make sure that the rolls are interlocked with each other and will properly withstand the transversal loads without failing.

The image shows the jobsite just after the application of the Acryrubber and the Acryfelt Mesh
Application of third layer of Acryrubber for rooftop waterproof
This phase is about the application of the third layer of Acryrubber.
This can be considered the final layer in a normal situation when the rooftop does not need to be used on a regular basis (parties, dancing or normal living activities).
In this specific jobsite we have also forecasted the Acrytop which is a strong finishing to make the rooftop walkable.
Note: we consider Acryrybber a solution for mere waterproofing, we do not suggest to do regular activities except for the normal maintenance. If you want to make the surface walkable we recommend adding Acrytop over Acryrubber.


The images show the application of the third layer of Acryrubber over the previous one.
The consumption of Acryrubber for this layer will be about 0.7 kg/sqm like in the second layer.
Note: in the third layer the Acryrubber can be applied without any dilution.

The image above shows the application of the third layer of Acryrubber.
The application of the third layer can be considered as the final coat of the waterproofing system.
The process of how to waterproof a rooftop is now completed if we only consider the mere waterproofing solution.
In this rooftop we have forecasted the reinforcement Acryfelt Mesh, Casaband SA and a total consumption of approximately 2kg/sqm of Acryrubber applied in 3 different layers.
We will now move forward to the application of Acrytop as a final and walkable layer.
Application of Acrytop
The owner of the project made the rooftop for a normal daily use (and not only for maintenance) so Casali technicians have proposed the use of Acrytop, a colored synthetic resin based coating with quartz sand filler in water solution, that is resistant to pooling and has excellent anti-abrasion and non-slip properties.

The image shows the application of Acrytop over Acryrubber.
The application of Acrytop is required when the rooftop will be used for normal daily use, the product’s property ensures excellent anti-abrasion properties and ensure the strength of the waterproofing solution which will not be affected by the normal daily use it.
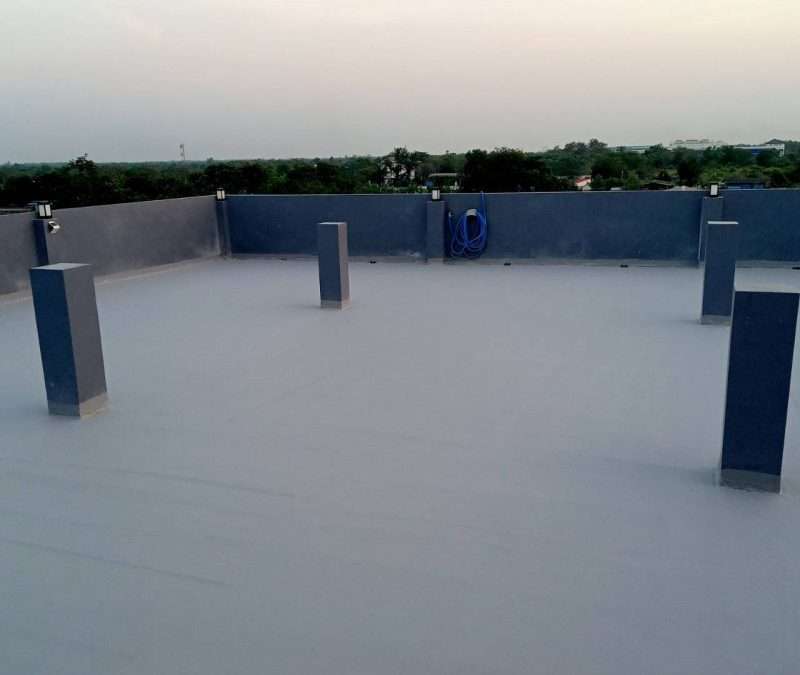
Job Completed
The final jobsite is a rooftop that will ensure a long lifespan of the waterproofing system.
The full cycle of how to waterproof a rooftop was completed and well executed.

The products that we have used in the jobsite are:
Click the video below to see the clip on how to waterproof a rooftop

If you want to know more about Casali range of products, systems and solutions you can contact us by the CONTACT page of by the contact form below.